There’s been plenty of Augmented Reality examples about lately (see this and this for instance). A lot have been done using FLART which is a port of of an AR library by a Japanese guy with the moniker Saqoosha fortunately, others like Mikko Haapoja have done a lot of work to figure out how to use it. After starting to read up on this, I discovered the work of Eric Socolofsky working as Transmote who has developed a really nice wrapper for FLART, the FLARManager.Not only that, but he’s got some really nice examples you can download and explanations of what’s going on.
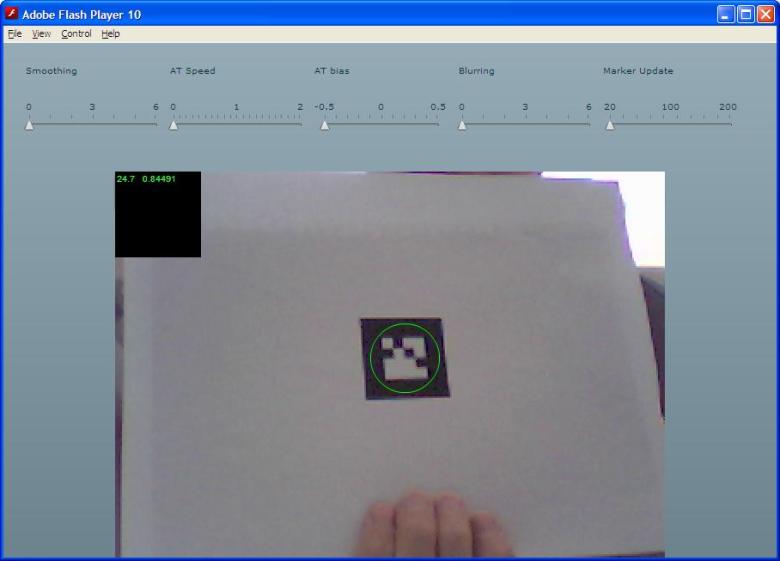
There are various parameters you can tweak when using FLARM so one of the first things I’ve done is to play with one of his example files to create an app to allow you to change them all on the fly and see what effect they have. Here’s a picture of it in action:

tuning FLARM
The circle shows the marker has been recognized, the two values in the top left corner are the current frame rate and the confidence the app has in the marker.
So far, I haven’t been able to make anything dramatically better than the defaults he provides but I have found that pushing the Adaptive Threshold bias (especially in the wrong direction) or setting blurring more than about 2 seems to be a bad idea. I have an older PC (circa 2003) that I think will really struggle with this based on the sort of frame rates I saw with the GE app running on it so I plan to try this out on that and with different lighting conditions to see if I can learn anything useful from that.
Something else I’m thinking about is using run time inputs to help improve parameters (especially in the slow/low light type conditions). For instance, you could use the frame rate as a basis to decide your smoothing and marker update (if the frame rate is low, you want to smooth over less frames as the image could have changed a lot and you can afford to have a higher marker update threshold for the same reason – bigger changes between frames). Another potential change is figuring out your Adaptive Threshold bias based on the amount of light you’re reading from the incoming frames, light make it +ve, dark -ve.
Here’s the source for the app in case you want to try it (you’ll need to have the latest FLARManager and don’t forget to compile for Flash 10).
<?xml version="1.0" encoding="utf-8"?>
<mx:Application xmlns:mx="http://www.adobe.com/2006/mxml" layout="vertical" width="900" creationComplete="startup()">
<mx:Script>
<![CDATA[
import examples.*;
import mx.containers.*;
private var flarWindow:FLARManagerTutorial_2D;
private function startup():void {
var panel:Panel = new Panel();
flarWindow = new FLARManagerTutorial_2D();
panel.percentWidth = 75;
this.addChild(panel);
panel.rawChildren.addChild(flarWindow);
}
private function updateSmoothing():void{
flarWindow.flarManager.smoothing = smoother.value;
trace(“smoothing set to: ” + flarWindow.flarManager.smoothing);
}
private function updateAT():void {
flarWindow.flarManager.adaptiveThresholdingSpeed = atSpeed.value;
trace(“AT speed set to: “+flarWindow.flarManager.adaptiveThresholdingSpeed);
}
private function updateATBias():void{
flarWindow.flarManager.adaptiveThresholdingBias = atBias.value;
trace(“AT Bias set to:” + flarWindow.flarManager.adaptiveThresholdingBias);
}
private function updateBlurring():void {
flarWindow.flarManager.sampleBlurring = blurring.value;
trace(“Blurring set to: ” + flarWindow.flarManager.sampleBlurring);
}
private function updateMarkerThreshold():void {
flarWindow.flarManager.markerUpdateThreshold = markerUpdate.value;
trace(“updateMarkerThreshold set to: ” + flarWindow.flarManager.markerUpdateThreshold);
}
]]>
</mx:Script>
<mx:Tile direction=”horizontal” width=”100%”>
<mx:Label text=”Smoothing”/>
<mx:Label text=”AT Speed”/>
<mx:Label text=”AT bias”/>
<mx:Label text=”Blurring”/>
<mx:Label text=”Marker Update”/>
<mx:HSlider id=”smoother” minimum=”0″ maximum=”6″ snapInterval=”1″ tickInterval=”1″
labels=”[0,3,6]” thumbRelease=”updateSmoothing()” />
<mx:HSlider id=”atSpeed” minimum=”0″ maximum=”2″ snapInterval=”0.1″ tickInterval=”0.1″
labels=”[0,1,2]” thumbRelease=”updateAT()” />
<mx:HSlider id=”atBias” minimum=”-0.5″ maximum=”0.5″ snapInterval=”0.1″ tickInterval=”0.1″
labels=”[-0.5,0,0.5]” thumbRelease=”updateATBias()”/>
<mx:HSlider id=”blurring” minimum=”0″ maximum=”6″ snapInterval=”1″ tickInterval=”1″
labels=”[0,3,6]” thumbRelease=”updateBlurring()” />
<mx:HSlider id=”markerUpdate” minimum=”20″ maximum=”200″ snapInterval=”20″ tickInterval=”20″
labels=”[20,100,200]” thumbRelease=”updateMarkerThreshold()” />
</mx:Tile>
</mx:Application>
I also made a few changes to the FLARManagerTutorial_2D file. The first was to make the FLARManager instance public so I could mess with it in my app and the other was to get the frame count and confidence displayed. Here’s the code I added to the constructor:
var framerateDisplay:FramerateDisplay = new FramerateDisplay();

confText = new TextField();

confText.defaultTextFormat = new TextFormat("_sans", 10, 0x33FF33, false, null, null, null, null, "left", 30);

confText.background = true;

confText.backgroundColor = 0x000000;

confText.text = "Waiting...";

this.addChild(confText);

this.addChild(framerateDisplay);
Then just update the confText in the event handlers for marker added and marker updated like this:
this.confText.text = evt.marker.confidence.toFixed(5);
I’m sure there are far cleaner ways of doing this but it was enough to get up and running. Let me know if you try this out and get any interesting results.
