Learning Flex – Lesson 25, Debugging, Logging and Error Handling

Debugging

Perhaps the simplest form of debugging is adding a trace() statement to your code to print out when a function is entered or the value of a variable at a particular point.

In addition to the global trace() method, the <mx:TraceTarget/> tag allows you to see communication with a remote server. This can be particularly useful in determining what (if anything) your server is returning for your requests.

TraceTarget actually sets up the Flex logging API. The appearance of the server communication is down to the fact that the internal Flex components mx.rpc.*, mx.messaging.* and mx.data.* all use this API. We’ll come back to logging later.

A more interactive strategy for finding errors is to use a debugger. If you’re fortunate enough to have access to Flex Builder, you have a built-in graphical debugger that will allow you to set breakpoints, inspect variables etc.  If not, the Flex SDK comes with a command line debugger – fdb. This can be found in the bin directory and started by typing fdb and then run location of swf or just fdb location of swf directly. You can use help or tutorial at the fdb prompt to get information on the commands available. Basically you can set breakpoints (even conditional ones which the Flex Builder version doesn’t support), step through code and print or change the values of variables. It’s not quite as easy to use as the Flex Builder version but it will get the job done. There are also some 3rd party free tools available such as Demonster Debugger which can give you some of the features of a graphical debugger along with memory usage and frame rates but unfortunately, don’t support breakpoints.

Here’s Adobe’s info on the command line debugger and here’s a great chapter from the book Programming Flex 3 that OReilly have kindly put on their website that covers the command line debugger, the Flex Builder debugger and the logging framework.

Logging

The aforementioned OReilly chapter covers this topic really well. You can define different levels of logging (debug, warn etc) and filter on which you want to be logged. You can also determine what happens to your log data so for instance, you could arrange to log particularly worrying errors back to your server or perhaps to a local file that support staff could request users email them if problems occur.

Error Handling

Like most modern languages, ActionScript3 has the concept of exceptions and the associated try, catch, throw and finally commands.

Runtime exceptions occur during the operation of the application, often due to unexpected input or problems communicating with remote systems. In these situations, you can place the potentially troublesome code within a try-catch block like so:

try{
some dangerous code
}catch(e:Error){
do something about the error
}

Within the catch block, you can access properties and methods of the Error object: message; name; getStackTrace() – for debugger versions of the Flash player, returns the call stack for the error as a String and toString() which returns “Error” by default or the value contained in message if defined.

There are a number of error classes defined both by ECMAScript and ActionScript, more details on which can be found here.

You may define multiple catch blocks to deal with specific error classes. The rules are that the first catch block to satisfy the error will be executed and only one catch block may be run. For this reason, you should never use the base class Error before other catch blocks as it will always take the error.

The throw statement allows you to raise an exception which will bypass the normal operation of your application. You would normally do this if you have discovered a condition that prevents the normal flow of execution. You may either throw an existing error type or create your own by extending the Error class.

The finally statement should be placed after all catch blocks and is used to define code that should be executed regardless of whether an exception was raised or not (generally this is used for something like freeing resources requested in the try block).

Flash player 10.1 introduces the concept of a global error handler so you can trap errors that have otherwise not been processed. This allows you to have a catch-all point where you can at least log something and potentially inform the user before gracefully exiting.

According to the release notes (pdf), the current beta 2 of 10.1 has this functionality disabled but here’s a blog post from Christian Cantrell on how to do it using Air and here’s some more detail about the UncaughtErrorEvent.
Learning Flex – Lesson 21, Deploying Flex Applications

Adobe Integrated Runtime (AIR) allows you to write Flex applications that can be run from the desktop. AIR gives you access to features that are not available when running from the browser such as interaction with the local file system, an embedded database for client side storage and with the new AIR 2 beta , raw microphone data access and multitouch support amongst other things.

The basics of working with AIR are very similar to Flex applications. In Flex Builder or FlashDevelop, choose a new AIR project and instead of a root <mx:Application> tag, use <mx:WindowedApplication>.

In defining your application, the application id is important as this is used to register the app with the operating system so it needs to be unique. This value (along with other configuration data) is stored in the project’s application.xml file. Flex Builder allows you to specify the application id on project creation but FlashDevelop will default it to the project name so you’ll probably want to go in and change that. Further information on the application.xml file can be found here.

Because of the additional access they have, AIR apps need to be signed by a security certificate before they can be released.

You can create a self-signed cert or buy one from a certificate authority such as VeriSign (currently $499 per year) or Thawte (currently $299 per year). Note these are different to standard SSL certificates.

The downside to a self-signed cert is that the install screen will show a big red “?” along with the text “are you sure you want to install this application to your computer?” instead of the happy green “!” that you get with a valid paid certificate. You can find out more about how to get and install a certificate in this article.

FlashDevelop provides two batch files and an AIR_readme.txt file when it creates an AIR project to help you release your application. You can find out more information on packaging an AIR file (including potential error messages) in this article.

Learning Flex – Lesson 19, part II More Chart Customization

Chart Legends

The <mx:legend> tag uses it’s dataProvider property to determine what to display. This should be the id of the chart you want the legend for. It has style attributes to determine labelPlacement and direction of layout. It uses the displayName property of a series to determine what to place in the label.

Axis Renderers

You can customize the layout of an axis by using an <mx:AxisRenderer>; tag. This has properties such as canDropLabels, canStagger, title etc. The axis property is used to define which axis the renderer is to be used for. AxisRenderer tags are children of either an enclosing <mx:horizontalAxisRenderers>; or <mx:verticalAxisRenderers> tag.

Vertical axis titles default to rendering top to bottom. To get the more normal bottom to top, you can use an AxisRenderer with the property verticalAxisTitleAlignment set to vertical (thanks to McQuillen Interactive for that gem).

Data Tips

All charts support a boolean property showDataTips that when set to true, will show a tool tip type box when the user mouses over an element. By default, this shows the x and y value but you can specify a function for the property dataTipFunction to customize what’s displayed. This function should accept an object of type mx.charts.HitData and return String. The HitData object has a property item typed to Object which contains the dataProvider item the user has moused over on the chart.

Click Events

If a user clicks in a chart, a chartClick event will be dispatched if no data point is found under the mouse or itemClick if there is an item within the radius specified by mouseSensitivity (default 3 pixels) for the chart. The chartClick event provides the chart the user clicked on, the itemClick event provides a property hitData of type HitData that contains the chart dataProvider item the user clicked on the chart.

Data Selection

You can enable data point selection by setting the property selectionMode on the chart to none, single or multiple. You can select multiple points either by dragging a box around a number of points with the mouse or clicking them while holding down the ctrl/command key.

The selectability of individual chart series can be turned on or off by using the boolean selectable property on the series in question.

The change property on a chart can be used to define a call back function that will be called when the selection in a chart changes. The event fired contains a hitSet property which is an Array of HitData objects corresponding to the chart points selected.

It’s also possible to programatically  select chart items by setting the selectedIndex property for a single point or selectedIndices Array property of a series for multiple points.

Chart Animations

Three built in animations are provided for charts. They are subclasses of the mx.charts.effects.SeriesEffects class and are specified for a series showDataEffect or hideDataEffect attributes.

  • seriesInterpolate – this effect moves the graphics that represent the existing data in a series to the new points. It creates a smooth animation between the two sets of data. This effect is only valid for showDataEffect.
  • seriesSlide – this effect slides the chart data into and out of the chart boundaries. If you use seriesSlide with the hideDataEffect trigger, the series slides from the current position to off screen in the specified direction. For showDataEffect, the effect is reversed, from the specified direction into the chart.
  • seriesZoom – this effect implodes and explodes the chart data into and out of the focal point specified.

Customizing Chart Appearance

You can set styles using CSS for the chart as a whole, individual series in a chart or the axes. Many style elements may also be set inline as attributes of the relevant MXML tag. For instance, you may use the <mx:stroke> tag to specify the style of a chart’s item renderer and <mx:lineStroke> to define a line chart’s lines or <mx:areaStroke> for an area chart.

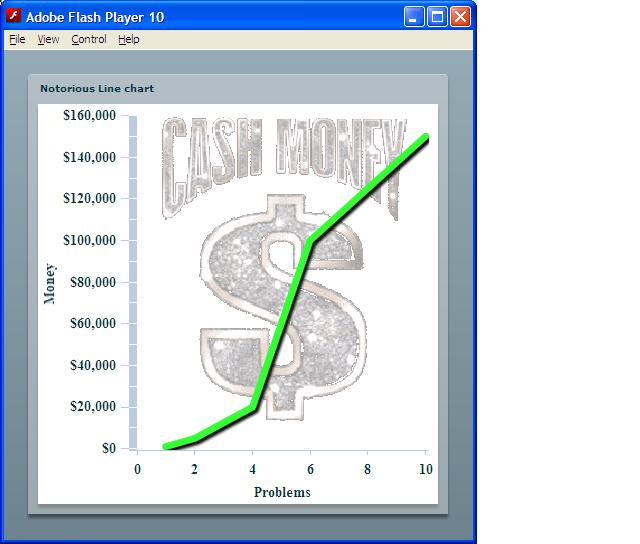
Here’s a more customized version of the line chart I had in the previous post:

<?xml version="1.0" encoding="utf-8"?>
<mx:Application xmlns:mx="http://www.adobe.com/2006/mxml">
  <mx:Script>
    <![CDATA[
      import mx.collections.ArrayCollection;
      import mx.charts.LinearAxis;

      [Bindable]
      public var notorious:ArrayCollection = new ArrayCollection(
      [ { money: 1000, problems: 1 },
      {money: 5000, problems: 2 },
      {money: 20000, problems: 4 },
      {money:100000, problems: 6 },
      {money:150000, problems:10 } ]);

      private function renderMoney(value:Number, previousValue:Number,axis:LinearAxis):String{
        return dollars.format(value);
      }
    ]]>
  </mx:Script>
  <mx:CurrencyFormatter currencySymbol="$" id="dollars" useThousandsSeparator="true"/>
    <mx:Style>
      LineChart {
         fontFamily:TimesRoman;
         fontSize:14;
     fontWeight:bold;
      }
    </mx:Style>

  <mx:Panel title="Notorious Line chart">
    <mx:LineChart id="myChart"
           dataProvider="{notorious}"
           showDataTips="true">
      <mx:series>
        <mx:LineSeries yField="money" xField="problems">
          <mx:lineStroke>
            <mx:Stroke color="0x33FF33" weight="7" />
          </mx:lineStroke>
        </mx:LineSeries>
      </mx:series>
    <mx:verticalAxis>
            <mx:LinearAxis id="vert" title="Money" labelFunction="renderMoney" />
        </mx:verticalAxis>
    <mx:horizontalAxis>
            <mx:LinearAxis title="Problems"/>
        </mx:horizontalAxis>
    <mx:verticalAxisRenderers>
      <mx:AxisRenderer axis="{vert}" verticalAxisTitleAlignment="vertical"/>
    </mx:verticalAxisRenderers>
        <mx:backgroundElements>
           <mx:Image
                source="@Embed('01-large-cash-money.gif')"
                alpha=".4"
           />
        </mx:backgroundElements>
    </mx:LineChart>
  </mx:Panel>
</mx:Application>

here’s a picture of the “improved” chart:

customized "Notorious" graph

(cash money image courtesy of   http://mindmillion.com/MONEY/)

For other chart components, you should take a look at Kap IT Lab or ILOG Elixir from IBM for charts that are free for non commercial use or the open source project Axiis if you want to construct your own data visualizations.

Learning Flex – Lesson 17, Working with Web Services

Flex applications can use web services that are defined by a WSDL (web Service Description Language) an XML based standard that defines available operations and possibly data types used by the operations.

Flex supports web service requests and responses that are formatted as SOAP (Simple Object Access Protocol) documents which are XML based.

There are two main ways to access web services in Flex, using tags or ActionScript.

Using the <mx:WebService> tag, the wsdl property specifies the URL to find the wsdl file at. Flex will load this file to find out the available operations. Once the wsdl file is loaded successfully, the WebService broadcasts a load event. You may also define a fault and result event handler for all interactions with the server.

The WebService tag may contain multiple <mx:operation> tags which have a name property for the service to be used and may specify result and fault event handlers specific to that operation.

Within the operation tag, you may specify an <mx:request> tag which can be used to specify the values for parameters to the operation (using binding for these values allows them to automatically update).

A fully declared WebService would look like this:

<mx:WebService
  id="myWebService"
  wsdl="http://myServer.com/wsdls/Services.wsdl"
  fault="handleError(event)">
    <mx:operation name="getAccountDetails" result="acountResult(event)">
      <mx:request>
        <name>{username}</name>
        <id>{userID}</id>
      <mx:request>
    </mx:operation>
</mx:WebService>

You can just specify the operation (declared method) within the WebService so you get to use the individual result/fault handlers and specify the parameters when you use the service or not bother with the operations at all (undeclared method) and specify everything when you use the service (but you’ll need to at least declare a result handler for the WebService in this case).

To call a WebService operation, you call the send() method on that operation, so for our previous definition, that would be:

myWebService.getAccountDetails.send();

To define a WebService using ActionScript, you must manually load the wsdl using the loadWSDL() method. Otherwise, it maps pretty closely as can be seen here:

private var myWS:WebService;
myWS = new WebService();
myWS.wsdl = "http://myServer.com/wsdls/Services.wsdl";
myWS.addEventListener("fault",handleError);
myWS.getAccountDetails.addEventListener("result",accountResult);
myWS.loadWSDL();

account = myWS.getAccountDetails(username,userID);

Note that you don’t need the send() this way.

You will run into naming issues if the operation you try to use happens to match a defined method of WebService. To get around this, you can use the getOperation() method on your WebService providing the operation name as a String. This will return an Operation for you to call using it’s send() method eg

myWS.getOperation("disconnect").send(param);

FlexBuilder has the capability to generate supporting code to use a wsdl’s operations by using the “import web service” wizard in the data menu.

You can find more detailed information on dealing with soap headers etc here. A useful tool when working with web services (to inspect wsdls, generate soap requests etc) is the free SoapUI tool.

FLARM and Dependency Injection

I’ve been taking a look at the latest FLAR Manager code with a view to implementing the histogram bias generation for adaptive thresholding I’ve written about previously. Now Eric’s separated out the threshold algorithm, that’s been made easier to achieve without worrying about future changes to the code base.

Eric’s implemented a nice dependency injection method where you declare the class name of the algorithm you plan to use in the config XML and the manager uses flash.utils.getDefinitionByName() to create it. As long as you implement the interface class, everything should work.

The one downside is that you need to define an object of the class you intend to use somewhere in the manager or the class won’t get included in the swf and you’ll get a runtime error when you try and create it.

It would be nice if you could remove any knowledge of the threshold class implementations from the manager source and just use configuration.

I knew Spring would need to do something like this which lead me to this. I decided to try implementing the resource bundle solution.

Here’s what I did:

  • create a locale/en_US folder in my project
  • create a classreferences.properties file in that folder
  • put the following lines in that .properties file:

#locale/en_US/classreferences.properties
Class1 = ClassReference("com.transmote.flar.utils.threshold.DrunkWalkThresholdAdapter") Class2 = ClassReference("com.transmote.flar.utils.threshold.HistogramThresholdAdapter") Class3 = ClassReference("com.transmote.flar.utils.threshold.DrunkWalkHistoThresholdAdapter") Class4 = ClassReference("com.transmote.flar.utils.threshold.IntegralImageThresholdAdapter")
(basically all the threshold adapters)

  • add -source-path locale/{locale} to my compiler additional options (locale defaults to en_US)
  • add the following to FLARManager.as at the Class level:
  • [ResourceBundle("classreferences")]
    private var _classReferences:ResourceBundle;

and now I can swap in whatever adapter I want in the xml config and it gets picked up. I like this solution because it keeps the FLARManager ignorant of the various adapters that are available – as long as you update the resource file, it’ll work – no need to include the adapter classes or create dummy variables for each of them.

The downside is, you’re creating a bigger swf file as you’re including classes you won’t use and you have to do more initial setup.

I’ll post the histogram based class I came up with next.

More Augmented Reality with FLARM

I finally got a chance to work on my idea of automating the adaptive threshold bias by looking at the bitmap data coming in. Basically, you want to set the bias -ve for a dark scene and positive for a lighter scene. What I came up with was using the histogram() method of the bitmapData class and summing the lowest 20 values for the dark number and the highest 20 for the light. Comparing these then tells you if the scene is light or dark. I decided to make the assumption that each colour channel would be roughly even so I only worked on the green channel but it would be trivial to expand it for all three.

I tried timing it getting Date() at the start and end of the function but it always comes back 0 so we can say it takes < 1millisecond.

I have some trace statements in too to check the results it’s coming back with but those were commented out for the timing. I added the method to the FLARManager class and I’ll pass the code on to Eric so he can see if he thinks it’s worth including.

Here’s the method in case you want to play with it:

public function calibrateThreshold():Boolean{
var histo:Vector.<Vector.<Number>> ;
var channel:Vector.<Number>;
var darkSum:Number = 0;
var lightSum:Number = 0;
//var startTime:Date;
//var endTime:Date;


try {
//startTime = new Date();
histo = this.flarRaster.bitmapData.histogram();


//assume even colour spread so use Green
channel = histo[2];


//sum the darkest and lightest values
for (var c:int = 0; c < 20; c++) {
darkSum = darkSum + channel[c];
lightSum = lightSum + channel[c + 235];
}


if (darkSum > lightSum) {
//scene is dark, set threshold bias -ve
this._adaptiveThresholdingBias = -0.5;
//trace("Scene is DARK");
}else if (lightSum > darkSum) {
//scene is light, set threshold bias +ve
this._adaptiveThresholdingBias = 0.5;
//trace("Scene is LIGHT");
}else {
//even - set threshold bias 0
this._adaptiveThresholdingBias = 0;
//trace("Scene is even");
}
} catch (e:Error) {
// this.flarRaster not yet fully initialized
return false;
}
//endTime = new Date();
//trace("calibrate took: " + (endTime.getTime()-startTime.getTime()));
return true;
}

I left the trace statements and date code in but commented out.

Augmented reality via FLART, FLARM

There’s been plenty of Augmented Reality examples about lately (see this and this for instance). A lot have been done using FLART which is a port of of an AR library by a Japanese guy with the moniker Saqoosha fortunately, others like Mikko Haapoja have done a lot of work to figure out how to use it. After starting to read up on this, I discovered the work of Eric Socolofsky working as Transmote who has developed a really nice wrapper for FLART, the FLARManager.Not only that, but he’s got some really nice examples you can download and explanations of what’s going on.

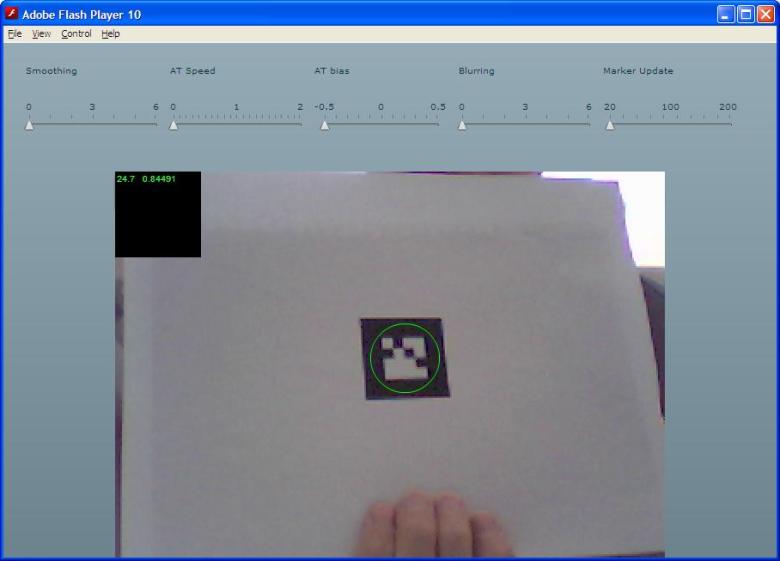
There are various parameters you can tweak when using FLARM so one of the first things I’ve done is to play with one of his example files to create an app to allow you to change them all on the fly and see what effect they have. Here’s a picture of it in action:

tuning FLARM

tuning FLARM

The circle shows the marker has been recognized, the two values in the top left corner are the current frame rate and the confidence the app has in the marker.

So far, I haven’t been able to make anything dramatically better than the defaults he provides but I have found that pushing the Adaptive Threshold bias (especially in the wrong direction) or setting blurring more than about 2 seems to be a bad idea. I have an older PC (circa 2003) that I think will really struggle with this based on the sort of frame rates I saw with the GE app running on it so I plan to try this out on that and with different lighting conditions to see if I can learn anything useful from that.

Something else I’m thinking about is using run time inputs to help improve parameters (especially in the slow/low light type conditions). For instance, you could use the frame rate as a basis to decide your smoothing and marker update (if the frame rate is low, you want to smooth over less frames as the image could have changed a lot and you can afford to have a higher marker update threshold for the same reason – bigger changes between frames). Another potential change is figuring out your Adaptive Threshold bias based on the amount of light you’re reading from the incoming frames, light make it +ve, dark -ve.

Here’s the source for the app in case you want to try it (you’ll need to have the latest FLARManager and don’t forget to compile for Flash 10).

<?xml version="1.0" encoding="utf-8"?>

<mx:Application xmlns:mx="http://www.adobe.com/2006/mxml" layout="vertical" width="900" creationComplete="startup()">

<mx:Script>

<![CDATA[

import examples.*;
import mx.containers.*;

private var flarWindow:FLARManagerTutorial_2D;

private function startup():void {
var panel:Panel = new Panel();
flarWindow = new FLARManagerTutorial_2D();
panel.percentWidth = 75;
this.addChild(panel);
panel.rawChildren.addChild(flarWindow);
}

private function updateSmoothing():void{
flarWindow.flarManager.smoothing = smoother.value;
trace(“smoothing set to: ” + flarWindow.flarManager.smoothing);
}

private function updateAT():void {
flarWindow.flarManager.adaptiveThresholdingSpeed = atSpeed.value;
trace(“AT speed set to: “+flarWindow.flarManager.adaptiveThresholdingSpeed);
}

private function updateATBias():void{
flarWindow.flarManager.adaptiveThresholdingBias = atBias.value;
trace(“AT Bias set to:” + flarWindow.flarManager.adaptiveThresholdingBias);
}

private function updateBlurring():void {
flarWindow.flarManager.sampleBlurring = blurring.value;
trace(“Blurring set to: ” + flarWindow.flarManager.sampleBlurring);
}

private function updateMarkerThreshold():void {
flarWindow.flarManager.markerUpdateThreshold = markerUpdate.value;
trace(“updateMarkerThreshold set to: ” + flarWindow.flarManager.markerUpdateThreshold);
}

]]>
</mx:Script>

<mx:Tile direction=”horizontal” width=”100%”>

<mx:Label text=”Smoothing”/>
<mx:Label text=”AT Speed”/>
<mx:Label text=”AT bias”/>
<mx:Label text=”Blurring”/>
<mx:Label text=”Marker Update”/>

<mx:HSlider id=”smoother” minimum=”0″ maximum=”6″ snapInterval=”1″ tickInterval=”1″
labels=”[0,3,6]” thumbRelease=”updateSmoothing()” />

<mx:HSlider id=”atSpeed” minimum=”0″ maximum=”2″ snapInterval=”0.1″ tickInterval=”0.1″
labels=”[0,1,2]” thumbRelease=”updateAT()” />

<mx:HSlider id=”atBias” minimum=”-0.5″ maximum=”0.5″ snapInterval=”0.1″ tickInterval=”0.1″
labels=”[-0.5,0,0.5]” thumbRelease=”updateATBias()”/>

<mx:HSlider id=”blurring” minimum=”0″ maximum=”6″ snapInterval=”1″ tickInterval=”1″
labels=”[0,3,6]” thumbRelease=”updateBlurring()” />

<mx:HSlider id=”markerUpdate” minimum=”20″ maximum=”200″ snapInterval=”20″ tickInterval=”20″
labels=”[20,100,200]” thumbRelease=”updateMarkerThreshold()” />

</mx:Tile>

</mx:Application>

I also made a few changes to the FLARManagerTutorial_2D file. The first was to make the FLARManager instance public so I could mess with it in my app and the other was to get the frame count and confidence displayed. Here’s the code I added to the constructor:

var framerateDisplay:FramerateDisplay = new FramerateDisplay();
confText = new TextField();
confText.defaultTextFormat = new TextFormat("_sans", 10, 0x33FF33, false, null, null, null, null, "left", 30);
confText.background = true;
confText.backgroundColor = 0x000000;
confText.text = "Waiting...";
this.addChild(confText);
this.addChild(framerateDisplay);

Then just update the confText in the event handlers for marker added and marker updated like this:

this.confText.text = evt.marker.confidence.toFixed(5);

I’m sure there are far cleaner ways of doing this but it was enough to get up and running. Let me know if you try this out and get any interesting results.

New Google Maps 3D

Google have updated their Flash API for maps to add 3D perspective maps. I stumbled upon their Geo developers blog which has a post on it here. Obviously I’m a little behind the times on this API as when I downloaded the SWCs they were now up to version 1_16 and my old ones were 1_8. I tried updating a simple test app I had to use the new map format and it was pretty quick and easy so if you’ve been playing with maps, give it a go.

I’ll be keeping an eye on that blog every so often to make sure I don’t miss out on anything else cool they might come up with!

It puts the lotion on its skin…

If the previous post about wizards & skinning has you itching to try writing your own rather than just taking and modifying someone else’s, you should check outDan Orlando’s Blog specifically the post he wrote for IBM Developerworks on Flex and CSS. It’s a great introduction into styling your app. You should also consider playing with the Adobe Flex Style explorer which allows you to play with styling components graphically and provides you the resulting CSS.

Thoughts on Catalyst

I haven’t played too much with this tool yet and it is still in beta so it’s hard to be too definitive with any opinions right now but there are some things I can say about it.

As a tool for creating prototypes and demos, I think it has a lot of promise. It doesn’t seem to take too long to create something that will give you an idea of the user experience you’re developing.

To use it for full on development projects, it has a few drawbacks. Not all components have a Spark version yet and it won’t do round-trips right now so if you try and take a project you went to FlashBuilder with back into Catalyst, it complains. It’s still beta and from Adobe’s marketing material, it seems like they intend to have all that working at some point so those  may be moot points later. A bigger potential problem in my view is how do you deal with an existing code base of lovingly crafted custom Flex4 components? If your designer uses Catalyst, it will be pumping out nicely skinned standard components and as a developer, you’re going to have to tease all of those out and replace them with your custom work where necessary.  It’s going to get tough if you’ve got skinning involved in those components too. You’re also going to get one big monolithic app that probably doesn’t match up too well with any design patterns.

This is not to say that with planning and careful consideration of what you’re doing, you couldn’t make it work but for bigger apps it’s not going to be a trivial task to take something from Catalyst and make it work effectively.

I think  if you were to use it to create the starting point for your reusable components and then still continue to do your main construction within Flasbuilder, you’re probably going to get the best results.

I’ll be interested to see if I can find anything on using it for larger projects and see what people come up with.